

 by
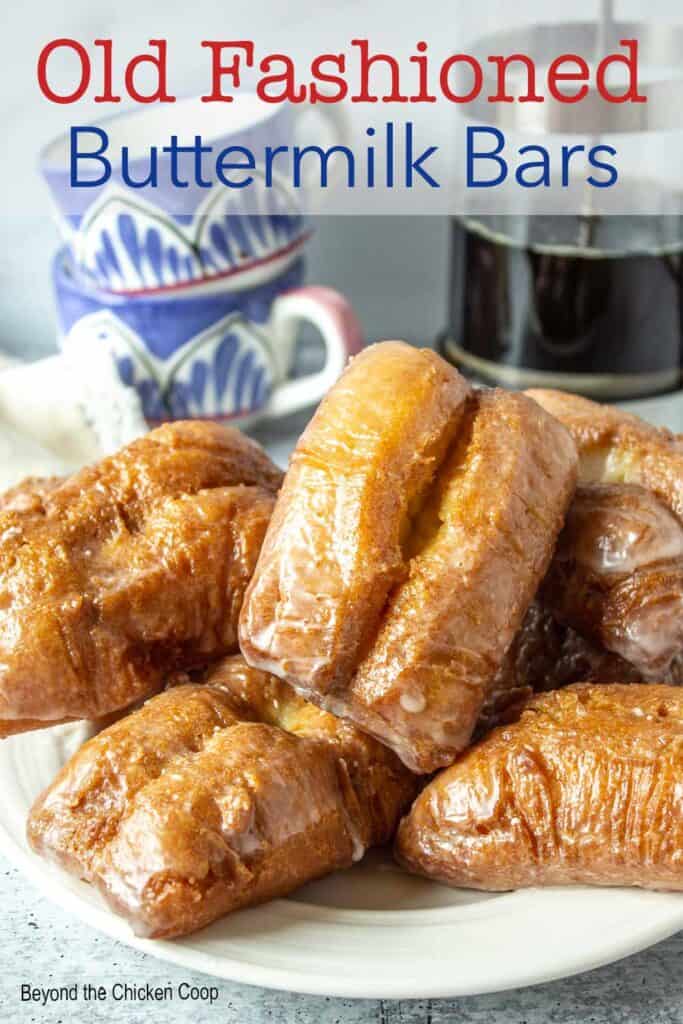
These homemade buttermilk bars are cake donuts with golden edges, a tender center, and a sweet vanilla glaze. A little nutmeg gives them that familiar donut-shop flavor, making them a delicious treat to fry up at home.

Jump to:
Homemade buttermilk bar donuts
These buttermilk bars remind me of the donuts my mom would sometimes bring home when I was a kid. They were an occasional treat, and that familiar nutmeg flavor still brings back memories. Making them at home lets me enjoy those same flavors, right down to the sweet vanilla glaze.
I love the combination of golden fried edges and a tender, cake-like center. The glaze adds a thin coating that sets as the bars cool, so you get a little sweetness in every bite.
These donuts use baking powder and baking soda instead of yeast, so there’s no rising time. The dough is soft and sticky, even after chilling. A well-floured surface and floured hands make it easier to shape into bars.
If you enjoy homemade donuts, you'll want to try these maple bars, apple fritters, baked chocolate donuts, baked mini powdered sugar donuts, and these cinnamon sugar donuts.

Key ingredients

- Buttermilk: Adds a slight tang and helps create a tender donut. You can always make your own buttermilk if needed.
- Flour: Use all-purpose flour for the dough, plus additional flour for your work surface and hands when shaping the sticky dough.
- Baking powder and baking soda: These give the bars their lift without yeast.
- Nutmeg: Gives the bars their familiar donut flavor. Use ground nutmeg or freshly grated nutmeg if available.
- Sugar: Granulated sugar sweetens the dough, while powdered sugar makes a smooth glaze.
- Vanilla: Adds flavor to both the dough and the glaze.
- Oil: I use canola oil for frying.
Steps to make
- Mix the sugar, melted butter, and vanilla. Add the eggs one at a time, mixing well after each addition.

- Mix in buttermilk

- In a separate bowl, combine the flour, baking powder, baking soda, salt, and nutmeg.
- Add the dry ingredients to the buttermilk mixture. Stir just until combined, using a spatula to fold in any remaining flour. The dough will be soft and sticky.

- Cover and refrigerate for at least 1 hour. Chilling makes the dough easier to handle, but it will still be sticky.

The dough will still be sticky after chilling. Use enough flour on your hands and work surface to handle it, but avoid kneading extra flour into the dough.
- Generously flour your work surface. Turn the chilled dough onto the surface and lightly sprinkle the top with flour.
- With floured hands, gently shape the dough into a rectangle about 24 inches long and 3 inches wide. You can also use a well-floured rolling pin.

- Cut into 12 bars, each about 2 × 3 inches. Keep them evenly sized so they cook at a similar rate.
- Just before frying, cut a deep slit lengthwise down the center of each bar without cutting all the way through. This helps the center cook through.

- Cook in preheated 375-degree oil. Cook for 1-2 minutes per side until golden brown.

- Transfer to a wire rack set over a baking sheet to drain. Then place on paper towels to absorb any excess oil.
- Continue frying the remaining bars, checking the oil temperature between batches. Keep it between 365°F and 380°F, allowing it to return to 375°F before adding the next batch.

- While the bars are still slightly warm, whisk together the powdered sugar, vanilla, and boiling water until smooth.
- Dip the top of each bar into the glaze.
- Return the bars to the wire rack, allowing excess glaze to drip onto the baking sheet below.
- Let the glaze set for 10–15 minutes before serving.

Tips for making buttermilk bars
- Mix gently. Once you add the flour, stir just until combined. Overmixing can make the bars tough.
- Chill for at least an hour. The dough is intentionally soft and sticky. Chilling makes it easier to shape.
- Flour your surface and hands. Use flour to prevent sticking while shaping, but avoid kneading extra flour into the dough.
- Keep the bars evenly sized. Thick or uneven pieces can brown on the outside before the centers cook.
- Don’t skip the slit. Cut deeply down the center of each bar without cutting through it.
- Check the oil temperature. Heat to 375°F and monitor between batches. Oil that’s too hot can brown the outside before the inside is done.
- Fry in small batches. Leave room between the bars and let the oil return to temperature before adding more.
Frequently asked questions
Yes. Cover and refrigerate the dough for at least 1 hour or up to 24 hours before shaping and frying. This lets you prepare the dough the night before and fry the bars in the morning.
This dough is intentionally soft and sticky, even after chilling. Generously flour your work surface and hands to make shaping easier. Avoid kneading extra flour into the dough, which can change the texture of the bars.
Bars that are too thick or oil that is too hot can cause the outside to brown before the center cooks. Shape the dough evenly, cut a deep slit down the center of each bar, and monitor the oil temperature. Cut open the first bar to check the center before frying the rest.
Storing buttermilk bars
Buttermilk bars are best enjoyed the day they’re made. If you have leftovers, allow the bars to cool and the glaze to set before storing in an airtight container at room temperature. They’ll still be tasty the next day, but will lose some of their fresh texture.

If you make this recipe, I’d love to hear about it! Leave a comment below and snap a picture and tag me on Instagram @beyondthechickencoop
Be sure to check out all my delicious baking recipes!


Buttermilk Bars
Video
Equipment
- Measuring Cups
- Measuring Spoons
- Cookie Sheet
Ingredients
Donuts
- 2 cups flour (plus additional flour for rolling out dough)
- 1 teaspoon baking powder
- ½ teaspoon baking soda
- ½ teaspoon salt
- ½ teaspoon nutmeg
- 2 tablespoons butter (melted)
- ¾ cup granulated sugar
- ½ teaspoon vanilla
- 2 eggs
- ⅓ cup buttermilk
- oil for frying (I use canola oil)
Glaze
- 2 cups powdered sugar
- 1 teaspoon vanilla
- ¼ cup boiling water
Instructions
Make the dough
- Mix the sugar, melted butter, and vanilla. Add the eggs one at a time, mixing well after each addition.2 tablespoons butter, ¾ cup granulated sugar, 2 eggs, ½ teaspoon vanilla
- Mix in the buttermilk.⅓ cup buttermilk
- In a separate bowl, combine the flour, baking powder, baking soda, salt, and nutmeg.2 cups flour, 1 teaspoon baking powder, ½ teaspoon baking soda, ½ teaspoon salt, ½ teaspoon nutmeg
- Add the dry ingredients to the buttermilk mixture. Stir just until combined, using a spatula to fold in any remaining flour. The dough will be soft and sticky.
- Cover and refrigerate for at least 1 hour. Chilling makes the dough easier to handle, but it will still be sticky.
Shape the bars
- Generously flour your work surface. Turn the chilled dough onto the surface and lightly sprinkle the top with flour.
- With floured hands, gently shape the dough into a rectangle about 24 inches long and 3 inches wide. You can also use a well-floured rolling pin.
- Cut into 12 bars, each about 2 × 3 inches. Keep them evenly sized so they cook at a similar rate.
- Just before frying, cut a deep slit lengthwise down the center of each bar without cutting all the way through. This helps the center cook through.
- The dough will still be sticky after chilling. Use enough flour on your hands and work surface to handle it, but avoid kneading extra flour into the dough.
Fry the bars
- Add at least 2 inches of oil to a heavy pot, leaving plenty of room above the oil. Heat the oil between 360°F and 375°F, checking with a thermometer.oil for frying
- Carefully lower 2–3 bars into the oil, depending on the size of your pot. Leave room between them.
- Fry for 1½–2 minutes per side, until golden brown.
- Check the first bar by cutting it open once it’s cool enough to handle. The center should be cooked through with no wet dough. If the outside browns before the center cooks, check your oil temperature and make sure each bar has a deep slit down the center.
Glaze the bars
- While the bars are still slightly warm, whisk together the powdered sugar, vanilla, and boiling water until smooth.2 cups powdered sugar, 1 teaspoon vanilla, ¼ cup boiling water
- Dip the top of each bar into the glaze.
- Return the bars to the wire rack, allowing excess glaze to drip onto the baking sheet below.
- Let the glaze set for 10–15 minutes before serving.
Notes
- Mix gently. Once you add the flour, stir just until combined. Overmixing can make the bars tough.
- Chill for at least an hour. The dough is intentionally soft and sticky. Chilling makes it easier to shape.
- Flour your surface and hands. Use flour to prevent sticking while shaping, but avoid kneading extra flour into the dough.
- Keep the bars evenly sized. Thick or uneven pieces can brown on the outside before the centers cook.
- Don’t skip the slit. Cut deeply down the center of each bar without cutting through it.
- Check the oil temperature. Heat to 375°F and monitor between batches. Oil that’s too hot can brown the outside before the inside is done.
- Fry in small batches. Leave room between the bars and let the oil return to temperature before adding more.
Nutritional Disclaimer:
Nutritional information is provided as a courtesy and should only be construed as an estimate rather than a guarantee. To obtain the most precise nutritional information in a provided recipe, you should calculate the nutritional information with the exact ingredients you are using when preparing the recipe using your preferred nutrition calculator.
Inga Hicks says
I tried this recipe and all sorts of wrong bells and whistles went off as I'm making it. The hydration is way too high, it creates a batter not a dough stiff enough to make a bar type donut. The texture was more like a pancake than a donut because the batter again, not stiff enough and the hydration is too high. I think a cup more flour or using cake flour of the same amount would have achieved much better results. My simple suggestion would be make an old fashioned donut recipe, cut the shapes into bars, then fry them, if you want really crispy craggy edges, fry them in lard. Then glaze as usual.
Kathy says
Hi Inga,
Thanks for you comment. I appreciate your suggestions, however these are not old fashioned donuts and the batter and the bars are very different. Yes, the dough is very sticky. This is the way it is intended. After you refrigerate the dough, it does become workable. You can certainly add additional flour, but the bars will not be the same.
Kathy
Eve says
Hello,
Just wanted to share this real quick in reply to the recent reviews (:
Sometimes, depending on where a person lives can, in fact, alter how a recipe comes out. For those in humid climates, they might find they need to add more flour, or less liquid, to make up for the humidity that already exists in the air.
For those that live in dryer climates, they might find a wet recipe is spot on, or just so happens to need even more liquid.
Can be pretty trippy stuff.
The same can apply for frying temperatures too. Depending on whether you live at a higher altitude, may depend on whether you need to lower the oil’s frying temperature. Allowing the donut to have more time to cook all the way through, without burning and having a soggy/raw interior.
Donuts, in the end, can be fairly simple and straightforward. But sometimes, there’s always the chance outside forces can alter how a recipe might come out. We live in a diverse world, after all (:
Thanks Kathy for sharing your recipes! I enjoy making your Banana Oatmeal Muffins!
Kathy says
Thank you for all your information! I appreciate it. 🙂
Raal says
I really appreciate the detail and very clear directions given in the recipe. However, as the another person commented, mine also came out undercooked in the middle and bland in flavor. I really wanted to love these, but it unfortunately did not turn out successful for us and I had to throw the batch out. I did keep a close watch with a candy thermometer on the oil temp. as well.
Kathy says
Hi Raal,
I'm sorry these didn't work for you. If the dough is too thick, they won't cook all the way through. You also need to have that slice in the center to help them cook. As far as the flavor, the sweetness comes from the glaze. The donuts or bars themselves are made just like the ones I had as a child. Everyone has different tastes and if you wanted you could always add cinnamon or other spices.
Kathy
Rebecca says
Do you think I could make the dough in the evening and fry first thing in the morning? Just trying to catch a little more sleep before I make these for someone!
Kathy says
Yes! That should work fine!
Jamel Wright says
Game changer! LOVE this recipe! I've been wanting to make these forever. The only change i made was frying them in olive oil and dipped them in melted dark chocolate. They did NOT last long!
Kathy says
Thanks so much!!! Love that you've dipped them in chocolate! Now I'm going to need to make them again and do a little dipping! 🙂
Millie says
have you cooked in an air fryer, I love buttermilk bars, but would like to try a little more "healthy" version.
Kathy says
Hi Millie,
I'm afraid I have not used an air fryer before so I don't know how they would turn out. I do have a few baked donut recipes (not the same as a buttermilk bar!) that you may want to try.
Kathy 🙂
Arrow says
These donuts turned out very poorly for us. They didn't cook all the way through, they weren't very flavorful and were a big disappointment. Not sure why they didn't turn out for us because it looks like it worked for other people. Very unfortunate.
Kathy says
Hi Arrow,
I'm sorry these didn't turn out for you. Did you use a thermometer to measure the temperature of your oil? If the oil is too hot, the outside will look cooked before the inside of the donut is cooked. The taste is mimicked after an old fashioned donut I ate as a child. It's different than a regular donut.
Kathy
Jamel Wright says
for those who want a 'healthier' version, use avocado or olive oil to fry.
I did it for my bagels and they turned out great!
Kathy says
Thanks for the tip. I don't fry my bagels. They are boiled first in water and then baked.
Tiffani says
Thanks for the great recipe. I made one change and I added chopped, drained maraschino cherries and a drop of almond extract to recreate a buttermilk bar I had in Oregon a few years ago. A definite keeper.
Kathy says
Hi Tiffani,
Thanks for your comment! Glad you enjoyed these buttermilk bars. The addition of the maraschino cherry sounds so interesting. I'll have to give that a try!
Kathy 🙂
Riley says
Great recipe I fried 3 and baked the remaining 9 (400F 18 minutes) of course there’s nothing like the fried version, still, very tasty! I glazed them hot out of the oven so it set up nice and crackly. I also injected some raspberry jam. I would make these again a bit less nutmeg next time for me. Thanks for the recipe 🙏
Kathy says
Thank you! I think now I need to try baking them and I love the idea of filling with raspberry jam. Great idea!
David @ Spiced says
For when "you are craving a donut"....so you mean all the time!? 🙂 I love a good donut, and these look fantastic, Kathy. They remind me of the donuts that Little Debbie makes - at least I think it was Little Debbie. I used to love those as a kid! I need to make a batch of these ASAP!
Kathy says
They are similar to those Little Debbie snacks. I was testing these one day for my husband and his friend. They were calling them Little Debbie's but after eating a few they started calling them "Little Kathy's". Who knows, maybe we have a new name!